Monday, December 27, 2010

LOL

This is a brief comparison between the HTC Desire Z and the Apple iPhone 4.


First is a dimensions comparison:

Length-wise the Desire Z is a bit longer by 4mm.

And is wider by 1.8mm.

In terms of thickness the Desire Z is thicker by 5mm.

Now they both feel to be about the same length and width in the hand, however the 5mm difference in thickness is definitely noticeable.

The first thing you notice is the volume button on the iPhone 4. Sleek.

Then the 'iconic' bands that supposedly will cripple the antennae. Seems they rectified it on the latest build of the iPhone because I cannot reproduce the signal deterioration as seen on videos.

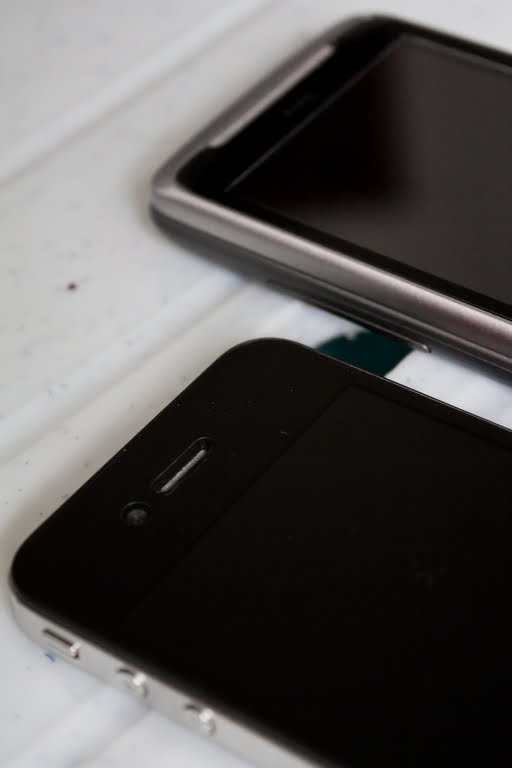
The iPhone 4 has a secondary front-facing 0.3 MPixel camera.

If coz it's only usable in wifi and between iPhone 4s. Some say they can use Fring, but meh, what if the other person doesn't have Fring and a data plan? lol

Both feature 5 Megapixel cameras at the back with AF and single LED flash.

Both feature a button in the bottom middle of the phone, but have totally different functions. lol

Desire Z uses a microUSB port at the side for all the microUSB shenanigans, while the iPhone uses a propriety port at the bottom edge.

I've gotta say the iPhone 4 is a gorgeous thing. Maybe it's the marketing done by Apple that gives you a certain amount of pride when you hold an Apple product.

Physical comparison aside...

Comparatively, the iPhone is a lot more fluid in it's screen movement compared to the Desire Z's occasional jitteryness.

However, the main attraction of the iPhone, it's App Store seem to cripple itself since a big majority of its apps have to be bought. Now in this geographical region the paid apps on the Android Market are filtered from my view so all i get to see are free apps, but still I get a good number of awesome games out of it, for FREE.

A prime example is the full version of Angry Birds, which is a paid app on the App Store and a free app on the Android Market. Awesome?

Now you might say that why wouldn't anyone pay for a game that's so awesome? Well not everyone wants to pay for apps on a phone. My uncle, who bought that iPhone 4 featured in this post, refused to buy any apps from the App Store. His kids were so excited when they saw Angry Birds on my phone because they can play more than the free Lite version of Angry Birds on the iPhone. lol.

Another beauty of the Android platform is that basically every part of the user interface is customizable. Some require a bit more effort to achieve, but even without rooting a lot more can be customised out of the box compared to the iPhone. Don't like the browser? Don't like the icons? Don't like the launcher? Don't like the on-screen keyboard? Don't like the messaging client?

Customise it.

This is in contrast to the dictatorship marketing of Apple. The 'you tak suka you keluar' kind.


So why would you want to buy an iPhone?

1) You're a fanboy.
2) You want a phone that just works
3) You appreciate the shifting effect of the screens that is iconic of iOS
4) You have money to spend on a phone that the innards you cannot customise
5) You are confident you won't want to do any customising on a phone
6) You hate Android phones.

Isn't it very unfair that whatever phone that comes out, it surely is compared to the iPhone? The Nexus One, the Evo, the Droid X, the Galaxy S, the Nexus S, Desire, Desire HD, Desire Z, N8 etc. The iPhone is not even considered a smartphone IMHO, at most a dumb down version of a simple phone, because people don't read prompts that appear on the screen anymore.

But who the hell hides the screen rotation lock toggle within the 'task manager' (double click home button on iPhone)? At least if you put it there have the courtesy to replicate the option in 'settings'. My uncle wanted a landscape keyboard after asking me how to enlarge the keyboard. I had to go to google to locate the toggle. WTF?

/nothing to do post.
===========================

Hey! Pay a visit to my 365 Blog @ http://365-knocks-n-bruises.blogspot.com

Wednesday, December 22, 2010

[REVIEW] HTC Desire Z

After years of reading reviews, I guess this is my turn to write one.

This is a review of the HTC Desire Z


Essential specs:

Android 2.2 w/ HTC Sense UI
5 Megapixel w/ Auto focus and single LED flash
Video capture up to 720p @ 30fps
480 X 800 SLCD display
1.5 GB user accessible storage
512MB RAM
Expandable external storage MicroSD (non-hotswappable aka slot is underneath the battery)

First up, a hardware overview.

The photo doesn't do the screen justice, seriously.

The screen is gorgeous. I have yet to see a Samsung Galaxy S but I've played with the iPod Touch 3, 4 and iPad. The screen on the Desire Z is on par if not better than the iDevices mentioned. Specifically it's better than the iPod Touch 3.

The pixels are so indistinguishable that I had to use the same macro procedure used to take the 10 sen coin congkak to snap this shot. Full size here (5MB big so gotta wait yeah...).


The phone is a side slider with a 4-row QWERTY physical keyboard. Personally I don't fancy the keyboard. Just don't like it. I primarily use it to key in passwords. I've read reviews that say it's the best keyboard on a phone, but meh, not feeling it.

EDIT: After about 2 months of using it, I LURRRRVVVEEEE the physical keyboard.


Another feature of the phone is the Z-hinge that gives the phone it's name (supposedly). Doubts have been cast on the hinge as to it's durability.

The hinge was known to be loose and the pieces of the phone separate when held in a compromising position. By my experimentations, I've concluded that the tilting angle for the hinge to close on itself is 45 degrees to the vertical. But it isn't really a problem as you gradually learn how to use the phone as intended by the manufacturer. They even issued a statement (scroll to the part where they review the hinge) saying that it is a design intent.


The touch-sensitive trackpad doesn't seem to serve much purpose besides moving the cursor around when you want to correct a typo. Even for that application sometimes I use the iPhone-esque magnifying glass thing to navigate the cursor. Custom ROMs have exploited this and have enabled trackpad wake so you can wake the device by clicking the trackpad. Nice.

EDIT: Only to know it's used to navigate in recovery. Nice.

My iPod friend said the square magnifying class is "cute". Bugger...


The camera sucks. Period. The default settings applied too much noise reduction that made it look like a pile of poo. After some tinkering (thanks to a thread on XDA Developers) I've got the NR disabled and pictures start to look nicer. HTC phones are not known for having a good cameras anyway so I'll leave it at that. I do appreciate the dedicated camera shutter button at the side though.

The loudspeaker is reasonably loud for media purposes. No compaints there.

GPS locks reasonably fast. Indoors (specifically in my room) for GPS Test to obtain the coordinates took about 1 minute 20 secs from a cold start (w/ accuracy to 15 meters). Outdoors it took a mere 20 seconds to obtain a coordinate lock. It was slightly cloudy as the rain has just stopped, but with visible clouds.

WiFi holds on to the signal great. In my room, locking on to my house's WiFi is faster on the Desire Z than my laptop. Sad, isn't it? However at my campus, it does take a while to connect to the WiFi signals there. I checked the signals with WiFi Analyzer and the channels overlap each other like nobody's business. Thing is an iPod connects fine while it takes at least 5 minutes of going 'Connecting' and then 'Disconnected' and repeating itself on this phone to obtain the IP address.

I must say, however that the WiFi channels at my school are as overlapped as *insert something that overlaps a lot*. One SSID will have 3 channels that overlap each other. I totally understand if the phone has problem picking out which channel to connect to. I solved this by connecting using the built-in WiFi connect function in WiFi Analyzer.

In terms of battery life, I say it's pretty standard? 16 hours with moderate GPS and WiFi usage. According to JuicePlotter, the battery drains 20 percent for every hour of WiFi usage.

There's this turn-over-to-silent function that works pretty well. It doesn't un-silent if you turn it over again though,

Now to software overview:

Launcher Pro, yo.

The phone is silky smooth. Scrolling from homescreen to homescreen is buttery smooth. Though sometimes after using the browser or playing games for some time when you return to the homescreen, it does take a while to load it up, but that's about it.

Browser wise, scrolling while fully zoomed out on the stock browser does present jitteryness, but no checkerboard whatsoever. Zoomed in however presents smooth scrolling (though sometimes a bit of jitteryness is felt). Jitteryness is solved by installing an alternative browser like Dolphin HD, and some patience to wait for the page to finish loading.

This is in contrast to an iOS device (this includes iPod touch 3 & 4 and iPad, no privilege to play iPhone yet) where smooth scrolling is available right after the page starts showing up, but you scroll around and checkerboard shows up. Even after the page finishes loading, the moment you scroll too fast for the browser to catch up, you'll see checkerboard.

Stock browser in tab switching mode.

Tabs management of the stock browser sucks. Yes there's the fancy pinch-out-and-see-tabs thing, but that took too many taps. Dolphin HD has the tabs at the beginning of the page and after pressing the menu button, so switching tabs is a better experience on an alternative browser like Dolphin HD.

Dolphin Browser HD. Awesome tabs.

Gaming wise, so far all the games that I've played ran smoothly. No rooting required to install apps from the APK package from the SD card. My iPod friend even said the screen smoothness (this is while playing Angry Birds), I quote, 'comparable' with an iPod.


Not much comments on HTC Sense UI coz I installed LauncherPro right after I got the device. I do particularly like the full-sized Sense Calender and Agenda widgets.

As far as multitouch is concerned, 4 is the maximum number of points the screen can track. Doesn't switch positions like how the Nexus One and original Desire did. They do switch if I place them very very close to each other.

I don't actually know where to place this, but the soft keys work well for me, so far.

The fast boot thing that HTC has advertised for the Desire Z and Desire HD are actually hibernate functions. It's not exactly a full boot. Pretty useful for turning off a phone temporarily. A full boot takes about a minute or so.

RRP now is RM2299 and yes, it's exactly the same RRP as the Desire HD. WTF, right?

That's it for the review. Anything you want to ask just comment below.

EDIT: Added stuff previously not possible to be done by stock phone. Hehe...
=============================

Tuesday, September 14, 2010

Black Cat

Never knew cats really do this:


=============================

Hey! Pay a visit to my 365 Blog @ http://365-knocks-n-bruises.blogspot.com

Tuesday, August 31, 2010

Phone From The Future

It's weird how lots of things are from the future nowadays. Continuing the trend of future-ness from the 'Offer from the Future', I saw this today:


See, this is a very attractive offer, because the phone offered is not only one generation ahead of it's time now, it's a total 2! It has to go thru the 4G phase before it goes on to the 4GS.

I wonder what is the ETA of that phone though if someone happens to win it. 2012?

=============================

Hey! Pay a visit to my 365 Blog @ http://365-knocks-n-bruises.blogspot.com

Sunday, August 29, 2010

Cheap reborn(d)ing!

I guess spelling is difficult when you want to decide whether to be reborn-ed (the act of converting to Christianity, or reigniting one's faith in Christianity), or straighten you hair (rebonding). You might not want to combine both though...


=============================

Hey! Pay a visit to my 365 Blog @ http://365-knocks-n-bruises.blogspot.com

Wednesday, August 11, 2010

Offer from the Future

Have you ever got those offer letters from institutions that you never applied to? It's weird how they get your name and address in the first place.

Well this one goes beyond that. This actually comes from the future.

Dated 28th August, but arrived 11th of August! Cool!

They probably invented a time machine for the sole purpose of sending these letters out, you know, to attract geeks.

Anyway, optometry? lol. Thing is their requirement is a CGPA 2.5. Makes you wonder...

=============================

Hey! Pay a visit to my 365 Blog @ http://365-knocks-n-bruises.blogspot.com

Sunday, August 1, 2010

PSA against Animal Cruelty

This is a public service announcement.

I'm not an animal lover. Period. I've never understood why people would spend thousands of moneys to feed animals when there're more people starving and malnourished in Africa and other impoverished places.

What I post here will not change my stance. Because I have been always against cruelty treatment of animals.

Click to enlarge.

Click to enlarge. This shot is sharp. You can see how the wound healed up nicely.


May the bastard who did this to these kittens get the karma he/she deserved.

I've got to say, if you have the smelly rotten heart to kick a kitten in the face and leave it's eyes bleeding like that, you're better off finishing the job and just end it's life. It breaks my heart to see this kitten living it's life like that. How if I kick you in the face so hard your eye balls bleed and go out of position, then I leave you wandering around.

Shot taken at my parent's hometown, near a warung.

Like I said, I'm not an animal lover. So if you plan to shoot me for not bringing these kittens in for treatment, please, it's a Sunday, public vets are closed, and I don't feel particularly for handling disfigured animals. This is the best I can do, hopefully reaching a larger media.

Judging by the severity of the disfigurement of the 1st kitten, it would probably not live beyond a few weeks, though it seems to be living fine. Maybe die of bacterial infection.

Tuesday, July 13, 2010

DIY Built-in / Pop-up Flash bouncer for DSLR V2.1

***THIS POST HAS A FOLLOW-UP. OPEN THIS LINK IN A SEPARATE TAB, FINISH READING THIS POST, THEN CLOSE THIS TAB AND PROCEED TO READ THE FOLLOW-UP ***

******************************************

2 weeks ago, I had an epiphany as I poured out the remainder of the orange juice from it's carton. I've been wanting an external flash for quite some time already. But the kiamsap in me is holding me back. And I thought, if all I've wanted to do is bounce flash, why not make a bouncer for the built-in?

Model V1.0 was made there and then. I cut the top off, cut out a flap to form the front output, and another one at the side to form the side output, and a flap from the bottom to open and close for bouncing from above. It didn't look nice, but it sure did it's job.

I also experimented with a milk carton (with white insides). Not that good as the output has a yellowish tint to it.

Yesterday, I finished another carton of juice, and saved it to make V2.0. The following is V2.1, a slight improvement done a while upon completion of V2.0. Used V1.0 as additional materials for V2.0. (Transformers style!)

***I've always wanted to make my own scientific report on something, so bear with me on the following format of the procedures***

DIY Built-in / Pop-Up Flash bouncer for DSLR V2.1

Aim:
- To produce a flash bounce for built-in / pop-up flash for digital single-lens reflex (DSLR) cameras.

History:
- It has been a common conception in photography that the built-in/pop-up flash unit is no good. To a certain point that is true but with the correct use of metering, flash compensation and an external accessory the built-in flash unit should be good enough to produce adequately exposed photographs.

- There has been DIY diffusers/ bouncers online, but none are made of this obvious material, and none are really that versatile. I searched and found no guide on making a bouncer/diffuser using a drink carton.

Materials:
- two 1-litre fruit juice carton (or any drink carton with silver-ish lining in the insides)
- cellophane tape
- rubber bands

Apparatus:
- cutting blade (ensure tip is sharp)
- scissors
- ruler
- hole puncher (or just use the scissors to make a hole)

Note 1: The carton used is a cuboid with square cross-section with the dimension of 7.1cm X 7.1cm X 19.5cm (body only, does not include tip part that contains the cap and outlet to pour out the contents).

Note 2: The 6 sides of the carton shall be labeled "front", "back", "left", "right", "top" and "bottom" for the sake of this procedure.

Note 3: This procedure is tailor-made for the Canon EOS 1000D / Rebel XS. Please improvise step 3 for other makes of DSLRs.

Note 4: This procedure has been reverse-engineered as I did not plan to make a guide initially. The photos might contain features not mentioned in the steps before it.

Procedure:

1) Remove the top and bottom sides of the carton. Ensure a clean cut is made so that the appearance is presentable. By now you should be able to momentarily attach the carton to the top of your DSLR and bounce flash from the top. Proceed to step 2 for further fabrication.


2) Cut a hole at the front side measuring 6cm (horizontally) X 7 cm (vertically) about 3cm from the top. Repeat for right side.


3) By now if you attach the carton to the DSLR, you will notice that the bouncer is not secured properly. Few incisions need to be done to ensure a secure installation of the accessory.


First, you need to create allowance for the area around the mode dial. Make the incisions as demonstrated in the photograph. Remove the flap created due to the procedure if desired (recommended).


Then you will need to make allowance for the viewfinder. Again, make incisions as shown and remove flap if desired (recommended).


Now for the right side. Repeat. Flap removal not performed in the photograph.


To make allowance for the body portion containing the built-in flash, make an incision exactly 1.5cm to 2cm from the bottom approximately 4cm long. Make incisions as shown to create a flap (flap height about 1cm, flap removal recommended). Carve allowance for lens barrel.


4) Using another carton as material, cut 3 panels measuring 10.1cm X 7 cm. This 10.1cm was calculated to create a 45 degree bouncing angle for the bounce, using Pythagoras theorem.

Cut another smaller panel measuring 5.7cm X 6.5cm ( 5.7cm also to create 45 degree bouncing angle. 4cm is the height of the flash unit measured from the highest point of the camera body without releasing the flash unit. 4 cm is the length from the body of the bouncer to the joint that fits the bounce card. This results in a 5.7cm length for the hypotenuse for this triangle)


5) Here on : trim panels to fit inside of the bouncer. Ensure that the panels don't swing loose, and that some friction exist between the edge of the panels and the body of the bouncer.

Secure the smaller panel (herein referred to as the bounce card) with cellophane tape as shown, to the inside of the front side of the bouncer. The edge of the bounce card should be 1cm away from the edge of the bouncer.


6) Secure one of the remaining panel to the inside of the back of the bouncer as shown. The edge of the panel should be aligned to the edge of the body of the bouncer. This will create surface of 45 degree when flipped to rest against the inside of the front side. The insides of the bouncer should still look uniformly silver-ish at this point.


7) Secure another panel to the inside of the right side. The edge of the panel should be aligned to the edge of the body of the bouncer.

This will create both a wall at the right side and a 45 degree surface to bounce light to the right side. Please note that the silver-ish side should be facing OUTSIDE after this step as shown in the photograph.


8) Secure the last remaining panel to the outside of the front side, aligning the edge of the panel to the edge of the bouncer. Excess cellophane take should be used to securely affix this panel to the bouncer as shown. The silver-ish side should face inside the bouncer. This will form a wall on the front side of the bouncer.


The outside of the front side of the bouncer should look like the following photograph. Use a cellophane tape (or in this case, a sticker found on the body of the carton itself :-P) to loosely secure the other end of the front panel to the body.


8) Attach the bouncer to the DSLR. Find a spot to punch a hole to secure rubber bands to. The rubber bands will loop underneath the DSLR and around the lens.


**** End of fabrication****


Review:

The front should look like this , with the front panel opened and resting against the top (don't mind the gap, I corrected for this in the procedure).


The right side:


This is the same configuration with the front panel opened.


Overall appearance (artsy ones should be able to decorate the bouncer a bit. I couldn't be bothered to)


Installation:

The bounce card should be made to rest in the joint created between the top of the DSLR body and the flash unit itself (the use of the middle finger for this procedure is highly recommended)


Results:

The following is a series of photographs showing the different effects achieved by the different configurations of the bouncer.

All photographs have the setting f/5.6, 1/60, ISO800, 55mm, flash compensation +1, except the control. Used the kit lens to stick to the 'beginner' style of things. None have been altered digitally except for converting to JPG for the purpose of uploading to this blog. The distance of between the lens mounted on the camera and the object is approximately 44cm. The ceiling is approximately 3m from the tip of the bouncer.

Camera upright:

The control (no flash)

Flash with no bounce


Flash with bouncer, output off ceiling.


Output to front, 45 degree surface not resting against front side.

Output to front, 45 degree surface resting against front side.

Output to side, 45 degree surface resting against left side. (I think some light is bounced off the wall)

Camera in portrait orientation:

Output to side, bounced off ceiling.

Sample pic of V1.0:

Restaurant ceiling about 2.5m high. Moderately lit. F2.0 @ ISO800.


Discussion:
- The sole non-silver-ish wall in the bouncer does not seem to affect the color of the flash captured by the camera.

- The carton used in this procedure does not seem to be burnt by the constant burst of flash performed by the built-in flash unit.

- The open top side should not concern the user as:
a) if the front output is used, the front panel will be opened and rest against the top of the bouncer. Additionally the 45 degree surface will reflect most light towards the front when it is used.

b) if the side output is used, the 45 degree surface has to be deployed as it's function is to reflect light. The deployment of this 45 degree surface shall suffice in reflecting most light to the side output.

Hence the open top side is not of concern regarding amount of light reflected.

- The friction that exists between the bouncing surfaces and the inside surfaces of the bounce should keep the surfaces in position for bouncing purposes.

- A milk carton is not recommended for use of this project as the flash output will result in a slight to heavy yellow tint (might vary according to make of carton).

- Due to the inadequate output power of the built-in / pop-up flash, an ISO of 800 or more and aperture setting of F4 or wider is recommended. I don't have much knowledge regarding built-in flash output bias. It seems anything above -1 gives identical flash output when coupled with the bouncer. Do experiment with different flash bias. I recommend starting off with +2.

- The slit in which the body portion containing the built-in /pop-up flash unit should not interfere with the deployment of the flash unit itself. This is because the flash unit has to be deployed beforehand to make use of the bounce card. However the bouncer can be used without utilising the bounce card and exposure is still adequate (V1.0 does not have the bounce card). The slit still will not obstruct the deployment of the built-in flash unit as there is a mechanical barrier between the slit and the body portion containing the built-in / pop-up flash unit.

- Storage of the bouncer can be performed by flattening the bouncer with the bouncing surfaces resting against it's respective sides. However, doing so will reduce the structural integrity of the bouncer by a bit and the bouncer will tend to lose it's stiffness characterised by it's cardboard material after repeated flattening.

- Front output of the bouncer seems to be a bit harsh. Further improvement can be made by creating another output at the left side of the bouncer and a respective panel following the procedure step for the right output. This, when used with both the left and right panels opened and bouncing surfaces resting against each other, should create an even spread of diffused light towards the subject.

An additional wing-like add-on structure can be fabricated to be attached to the back side of the bouncer to bounce light from the left and right output towards the subject. This should further diffuse the front output light.

Conclusion:
- The bouncer created can provide adequate bounce off the ceiling. An ISO 800 or more or and aperture F4 or wider is recommended to compensate for the relative weaker power of the built-in/pop-up flash unit. F4 on the 18-55mm kit lens is available at 32mm or wider.

Update: Current model now V2.2. updated measurements for the allowance for the body portion containing built-in flash unit. Also added instruction to carve out allowance for lens barrel (previously present in V1.0 but left out in V2.0).

There you go. Is there a way to license this under Creative Commons? Wanna make it open source. LOL.
=============================